Overview | Recommended Readings for Children | Common Questions Parents have regarding O&M | Free White Cane Application | Games that Enhance the O&M Experience for Children | Glossary of most common terms | Recommended readings for parents | National Organization of Parents of Blind Children
Common Questions Parents have Regarding O&M
Following is a list of the most commonly asked questions related to O&M for Children. Click each link to find the answers to your questions.
Why the straight cane vs. the folding cane?
Why the longer cane vs. the shorter cane?
What about the metal tip vs. the plastic ‘marshmallow’ tip?
Where can one purchase a long white cane?
What can I expect my child to learn in O&M?
What is ‘sighted guide’ or ‘human guide’?
What is the proper way to go ‘sighted guide’ or ‘human guide’?
How can I enhance my child’s independent travel skills?
What does my child need to bring to O&M class?
Why does my child need to use the cane outside of O&M class?
Does my child need to count stairs or steps?
Does my child need to use the cane in the house or on our own property?
What is “Structured Discovery”?
Why does my child need to wear sleep-shades during O&M training?
Why put a keychain on the cane?
What is the procedure for walking through doorways?
How can one change a metal cane tip?
Can a Teacher of Students with Visual Impairments also teach Orientation & Mobility?
Answers to questions Parents have Regarding O&M – These are the links to the questions above.
Why the straight cane vs. the folding cane?
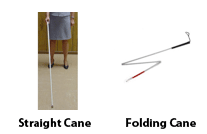 Folding canes (with metal tips) can be useful in a number of ways such as tandem bike riding, where it would be difficult to store a long straight cane. Longer folding canes can easily be stored in small compact automobiles. Folding canes can be used as a backup on trips and can easily be stored in carry-on luggage or suitcases.
One disadvantage of the folding cane is the elastic cord that runs through the middle of the cane can stretch and break after prolonged use rendering the whole cane un-useable.
The straight cane is lighter than the folding cane which allows the individual to travel further with more comfort. The straight cane does not hinder tactual information whereas the folding cane has several joints and with each joint, tactual information is lost. Tactual information is important because it gives the traveler information about the terrain.
Why the longer cane vs. the shorter cane?
The longer cane allows more reaction time for the user. Let me put it this way, as an automobile driver – if the vehicle in front of you suddenly stopped, would you want two seconds or four seconds of reaction time before applying your breaks in order to avoid the collision? It didn’t take you long to answer “four seconds” of reaction time. The longer cane gives the user more time to react when he/she finds a drop-off such as the edge of the sidewalk or stairs. The longer cane also permits the user to travel with better posture, travel faster and travel with more confidence as they gain experience using the long white cane. A traveler who is not confident often brings about concern by the public, who tends to observe an extended amount of time. A confident traveler is one that observers tend to look upon with respect.
What about the metal tip vs. the plastic ‘marshmallow’ tip?
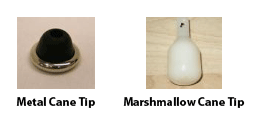 The metal tip offers more distinctive auditory feedback than the white plastic marshmallow tip. When traveling with the metal tip, the user can hear echoes as he/she approaches buildings, cars, doorways, open spaces vs. enclosed areas, etc. The metal tip can also better detect tactual changes such as sidewalk vs. grass, carpet vs. tile, wood vs. cement. Beginner cane travelers may not be able to hear the auditory feedback. Hearing the auditory feedback comes with practice and use of the cane. It is exciting when beginner cane travelers actually “hear” what their cane is telling them.
Metal cane tip → ← Marshmallow cane tip
Where can one purchase a long white cane?
Free straight canes are offered through the National Federation of the Blind. One may fill out an application on-line at: https://freecane.nfb.org/.
What can I expect my child to learn in O&M? In O&M class, your child:
* builds and perfects O&M techniques
* learns to independently gather information from the environment
* develops and uses independent problem-solving skills
* develops high expectations of self and others
* builds self-confidence
* enhances abilities to travel independently
* develops decision making skills about where and how to travel
* understands, creates, and/or enhance mental mapping skills
* develops self-monitoring skills
* perfects hearing to detect auditory cues
* perfects the feel of the cane to detect tactual changes, curb drop offs, etc.
* develops knowledge in cardinal directions
* utilizes the ability to use cardinal directions to enhance their travel
* practices proper cane etiquette
* builds travel speed
* builds travel confidence
* becomes a competent traveler
What is ‘sighted guide’ or ‘human guide’?
Sighted guide (aka: human guide) is when a person leads a blind person from one location to another. Usually the leading person is sighted. However, a well experienced traveler who is blind may also be the leader. Thus, the term ‘human guide’ may be more appropriate.
What is the proper way to go ‘sighted guide’ or ‘human guide’?
Guiding a blind person is fairly simple. First, ask the person who is blind if he/she needs a guide. If a guide is needed, ask which side he/she prefers you stand - to his/her right or left. Then offer your elbow to him/her. He/she will hold your arm just above your elbow which needs to be bent about 90 degrees. He/she will walk about a half a step behind you as you both walk comfortably. As you stop for stairs, curbs, etc., he/she needs to stop, too. By walking a half step behind you, he/she will be able to feel you go up or down stairs, curbs, etc., and can easily follow your body movements. If the area you are traveling in is quite congested, move your hand behind your body so the blind traveler can step behind you. At this time, he/she may move his/her hand to your forearm until you have cleared the congested area. Use this technique any time you are walking in a single file, as well. When you get to your destination, he/she will let go of your arm.
It may be difficult for a small child to go human guide with a tall adult. In such cases, the child may gently hold on to the adult’s forearm or simply hold hands with the adult. At times, a tall blind individual may gently place his/her hand on the shoulder of a very short human guide.
How can I enhance my child’s independent travel skills?
1) Insist your child take his/her LONG WHITE CANE whenever he/she leaves the house. At school, it is best if your child has & uses their cane at all times. This suggestion may be an adjustment because you or your child may feel:
* Your child is not ‘blind enough’ to need the cane.
* Your child is able to take your arm and you can be the ‘human guide’.
* Your child is simply going a short distance such as to the car or a neighbor’s house.
* Your child has been to that store or restaurant several times and knows the layout.
* The cane makes my child ‘look blind’.
These excuses are missed opportunities for individuals to develop independent travel skills. In addition, these excuses actually enable your child to grow dependent on having a person with vision to guide them. Let’s look at the first one, “Your child is not ‘blind enough’ to need the cane.” If your child is unable to read regular print, is unable to read the menu behind the fast food counter, is unable to recognize faces of friend/relatives without them speaking first, bumps into people or objects, hesitates when walking or running AND the eye doctor says he/she is ‘legally blind’ or has a degenerating condition, then YES, your child is blind enough to benefit from the use of the long white cane.
Second, “Your child can take your arm and you can be the ‘human guide’. What about when your child needs to go to the restroom? Will you walk with him/her into the restroom when he/she is a teenager? At what age will that stop? What if you are the one who needs to go to the restroom or wants to talk privately with another adult? Will you make him/her stand or sit someplace while you tend to your needs? What if he/she wants to explore while you’re gone? What if there is a fire or some other emergency and he/she needs to leave quickly but does not have his/her cane in order to do so? What if? What if? As much as we would like as parents, we can’t protect our children at all times. We must provide them opportunities to develop independent skills so they can travel forward. (No pun intended.)
Third, “Your child is simply going to the car or the next door neighbor.” One never knows when there is an emergency and the child will need to travel independently in unfamiliar territories. The cane is a tool just like a hammer is a tool for a carpenter or a spatula is a tool for a cook. The cane needs to be accessible to the user at all times – in the car or at the neighbor’s house. Wherever, whenever.
Fourth, “Your child has been to that store or restaurant several times and knows the layout.” There could have been changes since the last visit. Perhaps there is now different staff or it is currently under construction. Perhaps the lighting is lowered causing even more decreased vision. All these factors can come into play and may hinder your child from traveling independently. However, by using the cane, your child can be successful in any location, regardless of any changes that may have occurred.
Finally, “The cane makes my child ‘look blind’.” The cane does not ‘make’ anyone ‘look’ blind. The cane makes blind individuals look independent. Without a long white cane, a blind person may bump into objects or people. This may cause some misconceptions about blindness. Others may think the individual has a different impairment rather than that of an individual who can’t see. The cane is an identifier; it provides information to others that the user has a visual impairment. Often times, individuals who do not use the long white cane would have to follow a request with an explanation about their visual impairment. For example, they may say, “Can you read the menu to me because I can’t see very well.” However, when one is using the long white cane, no explanation is necessary – the cane does it.
Simply put, if your child does not use the cane, your child may be putting him or herself in harm’s way...
2) Use human guide only in special circumstances. It is human nature for parents to hold hands with their children. This is different. If you are traveling (aka; walking) with your child and you want to hold his/her hand because of the parental love you have for your ‘young’ child then go ahead but when your child is older, holding hands may not be acceptable. Look around your community; do you see other children your child’s age holding their parents’ hands?
There are special circumstances where human guide is necessary. Here are a few:
* It is a true emergency.
* It is a crowded area and there are many twists and turns such as in a darkened restaurant and you don’t want to get separated following the host to the table.
* You need to get someplace extremely fast and the area is congested such as running to an airplane gate for takeoff and you’re late.
* Your child needs to go to the bathroom N-O-W!
3) Offer hints rather than observations to your child at opportune moments. When you are walking with your child who is blind/visually impaired, instead of stating your observations of what is ahead of you (“There is a car, steps, lamp post, or toy on the sidewalk.”) or jumping ahead to provide a bumper to protect your child from hitting that lamp post or doorway say, “Are you using your cane correctly?” or “Pay attention to what your cane is telling you.” By giving them the hint, they learn that something is coming up and they need to pay attention to the information their cane is supplying. Sometimes it is beneficial to let them learn by actually pumping slightly into an object. If a child lightly bumps their shoulder on a doorway, simply say, “If you were using your cane correctly, you would have found that doorway and not bumped into it.” At times, just a reminder to “use your cane” is all that is needed.
4) Place the same high expectations on your child who has the visual impairment as you would any of your other children. If you expect your child(ren) with vision to walk down to the corner store and pick up a gallon of milk or take out the trash, then expect your blind child to do the same. If you expect your child(ren) with vision to transport their own luggage to the bus, car, plane or train, etc., then hold the same exceptions for your child who has a visual impairment.
5) Monitor how your child is using the cane and offer reminders to use it correctly as needed. Here are some O&M guidelines:
a) When walking in an open area, down the hallway, in the parking lot, etc., the cane is used in the ‘extended grip’ technique:
- The cane needs to be held extended out from the belly button.
- The palm needs to be upward – facing the sky.
- The index finger needs to be wrapped around the cane. Often times, people will extend the index finger down the shaft of the cane but this can hinder the user from arching the cane wide enough causing themselves to bump into objects on that side of their body.
- The tip of the cane needs to tap from the left and right as wide as the user’s shoulders. (NOTE: There are some exceptions to ‘tapping’ the cane. Sometimes when one is looking for a curb or drop off, the cane can glide along the floor or ground constantly touching the surface.)
- When the right foot is extended forward, the tip of the cane needs to tap on the left side of the body. When the left foot is extended forward, the tip of the cane needs to tap on the right side of the body. (This is known as “walking in step”.) It is almost like “kicking the cane” without even touching it.
b) The ‘pencil grip’ is used for walking in congested areas, while standing in lines, or when the user is either uncertain of the terrain or is seeking a drop off. The pencil grip is when the cane is held like a giant pencil. The tip of the cane still moves to the right and left, as wide as the shoulders, while taking smaller steps forward. It is also used for walking up and down stairs.
c) For walking up stairs, the cane needs to be held with the tip downward and slightly raised above the next step in which the traveler is about to place his/her foot. The hand will be holding the cane below the handle as if it were a giant pencil (Pencil Grip). With a slight amount of pressure forward the cane will tap on their next step telling the user that another step is approaching. Once at the top, cane will spring slightly forward informing the traveler that the top has been reached. (When this technique is used correctly, the traveler is unlikely to make an imaginary step onto a nonexistent stair.)
d) For walking down stairs, the cane tip needs to be on the step in which the traveler is about to place his/her foot. The cane is parallel with the body and will raise the hand upward when there are no more stairs, informing the individual the bottom has been reached.
e) Storage of the cane when not in use (cane etiquette):
- When standing still, the cane needs to be held up and down.
- At restaurants, the cane can be propped in a nearby corner, placed along the floorboard or under a table.
- In automobiles, the cane can easily be stored between the seat and the door. It is not recommended to store the cane in the trunk of a car or else it will not be easily accessible in case of an emergency.
What does my child need to bring to O&M class?
1) Their cane.
2) A coat, jacket, or sweater for cool or cold days.
3) A few dollars for purchases at stores on occasion. (If this is one of their Individual Education Plan goals.)
Why does my child need to use the cane outside of O&M class?
One cannot be proficient in the skills necessary for independent travel when one uses the cane only during O&M class. By using the cane at every walking opportunity, children can build their O&M skills to where using a cane becomes second nature, such as turning your head towards a sound or answering the telephone when it rings.
Does my child need to count stairs or steps?
Counting stairs or steps is not necessary. When the cane is used correctly, one does not need to memorize the number of stairs or steps to particular destinations from specific locations.
Does my child need to use the cane in the house or on our own property?
Usually individuals who are blind don’t use their cane within their own homes or on their own property such as in the back or front yard. If your child feels comfortable without using it in those areas, that’s fine. However, if one has a large amount of property, then one may feel more comfortable with carrying their cane outside their home. In large yards, sound cues may assist with location identification. Wind chimes can be hung by the front and/or back doors. Flags flapping in the wind may help locate the main house or gravel walkways can help lead to a building away from the house.
What is “Structured Discovery”?
Structured Discovery is when the travelers ‘discover’ though experience the skills necessary for learning a particular task. In Orientation and Mobility (O&M), children learn independent travel by actually performing independent travel with guidance from the O&M instructor. For example, if a child has a desire to go to a particular location but believes there is a need to have someone with vision to assist, then go together but don’t tell the traveler ahead of time how many driveways to cross or how many steps to go down or up. Instead, when we get to a particular obstacle in our path, discuss the options of how to overcome the obstacle and then continue on your way. With this method, travelers develop skills which can be transferred to other situations they may encounter outside of class. At first, it is a little time consuming but as the child’s experience increases, so does travel speed and confidence.
Why does my child need to wear sleep-shades during O&M training?
 Sleep shades allow children, who have some remaining vision, to focus on their other senses – hearing, smelling, tactual changes in the terrain, gentle wind gusts, etc. Travelers with unreliable vision may consider this unreliable vision as true and depend on it which may place him/herself in danger. Sleep shade training provides travelers the abilities and skills they can depend on regardless of how much vision they lose in their future. NOTE: Due to extenuating circumstances, some children cannot wear sleep-shades during O&M lessons.
Why put a keychain on the cane?
The keychain is a way for an individual to identify and personalize their cane. Stress only one or two identifiers so the cane does not get too heavy at the handle causing the cane to be unbalanced.
What is the procedure for walking through doorways?
Here is a common courtesy suggestion: When walking ahead of a person with vision loss through a doorway, state which way the door is opened – on the right or left. That way the following individual with vision loss may reach out that hand to hold the door for him/herself rather than just walking through the doorway leaving you standing there holding the door.
How can one change a metal cane tip?
1) With the metal tip downward, place a drop or two of water in the black rubber cup.
2) Place the new cane tip on a hard floor with the metal down and the black rubber cup up.
3) Lay the cane on the floor with the old tip of the cane resting on top of the black rubber cup of the new cane tip.
4) Gently place one foot on top of the metal tip where the cane tip is resting on it. (If you are right handed, use your left foot and if you are left handed, use your right foot.)
5) Reach down and lift the cane upward while continuing to apply gentle presser on the tip with your foot. This will force the screw of the cane bottom to be inserted into the black rubber cup.
6) Slowly slide your foot off the tip as the cane is lifted upward.
7) Once the cane is straight up, twist and press the cane downward toward the floor to help get the screw securely inside the rubber cup.
8) Turn the cane upside down, wiggle and turn the new cane tip to help secure it on the cane. back to top
Can a Teacher of Students with Visual Impairments also teach Orientation & Mobility?
An individual must have certification in Orientation & Mobility (O&M) in order to be an instructor in O&M. Usually Teachers of Students with Visual Impairments (aka: TVI, Vision Teacher, TBS) do not also have certification in O&M.